by Eric Meier
As someone who has helped many friends and acquaintances move over the years, there’s one thing that I’ve come to realize: much of Ikea’s furniture is not built for the long-term. Consider this: when you pick up or move a piece of Ikea furniture, twisting and torquing the frame, stressing every screw thread and knockdown hardware bolt, you are doing so for the very first time. You built the piece on-site. It’s flimsiness is now being exposed for the very first time. I sometimes wonder if it this furniture was ever even designed to survive being moved at all—aside from gingerly sliding it across the room after you’ve first assembled it.
(This is in no way an indictment against Ikea—I actually like a lot of their products—I’m actually using Ikea as a stand in for all inexpensive flat-packed assemble-it-yourself furniture available nowadays.)
[pic of failed furniture]
So what’s the common denominator? Why isn’t this type of furniture standing up to the test of time.
MDF is the woodworking equivalent of toilet paper
The primary culprit is medium density fiberboard, or MDF. I don’t mean to invoke any unsavory images in your mind, but have you ever had to use a plunger in-earnest on a clogged toilet? Perhaps you’ve noted what happens to the toilet paper in these circumstances: it more or less disintegrates into nothing. While it’s not quite the same thing, MDF behaves in a very similar way in relation to stress (especially at points where the wood “grain” comes in contact with any hardware such as screw threads, hinges, etc.).
After looking closely at wood strength, I can tell you that the strength and uniqueness of wood is in its grain. Think of a series of fibers all running in the same direction, giving the wood a disproportionately higher amount of strength along the direction of the fibers.
[picture of wood screw]
When you drive a screw or fastener into a piece of wood, it is this fibrous grain that helps hold the screw threads firmly in place. On the other hand, one look at MDF and you’ll realize that these fibers are all missing, hence the comparison to toilet paper. It’s made up of sawdust and glue, more or less. Any fibers in MDF will be very short, and when compared to solid wood, very weak. Exacerbating the problem is MDF’s high weight. Even though it’s called medium density fiberboard, it tends to be about as heavy as oak, but nowhere near as strong! So every cabinet door, every desktop, every drawer is precariously held together or fastened with screws that must bear the weight of a pretty dense material, all the while almost completely lacking a wood grain to help hold things in place.
If MDF is so weak, why is the stuff even used?
Pragmatism. There are advantages to it. It is very wood-like, and can be produced, cut, and machined for a relatively low cost. And, as anyone who’s bought something from Ikea knows, you can buy unassembled furniture packed in an impeccably efficient cardboard box.
Reinforcing MDF furniture
So you’ve bought some new flat-pack furniture from Ikea or elsewhere, but you’re worried about it longevity. Or maybe you’ve grown attached to a piece already in your house, and want to make sure it endures through more than the next move. What can you do?
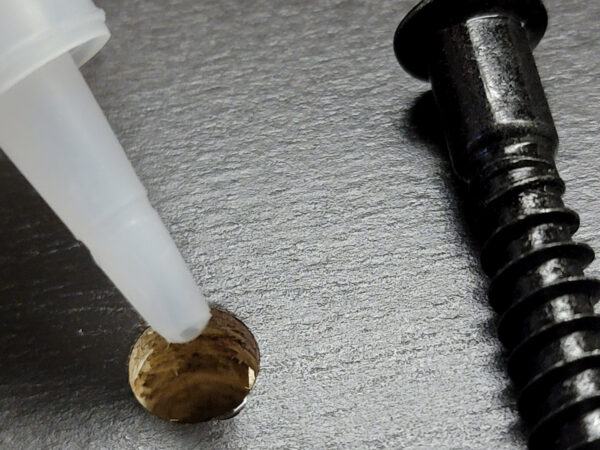
Use thin CA glue to reinforce the fibers
Cyanoacrylate ester, sometimes abbreviated as simply CA glue, is perhaps better known outside the woodworking/hobbyist community as super glue. But there are different viscosities of the glue, and what’s commonly marketed to the public is more of a gel in a tiny little tube. But what I am recommending is the water-thin variety, usually sold in slightly larger plastic bottles.
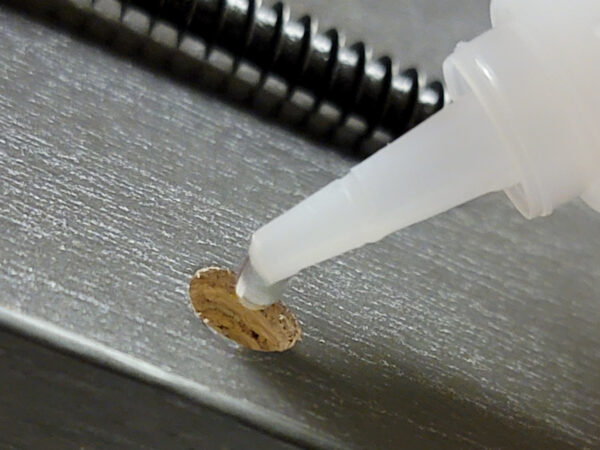
The thin CA glue will wick into the screw holes and other areas, harden, and greatly strength the holding power of the surrounding MDF. The most important area to wick CA glue is in and around the areas where the knock-down hardware bolts are screwed into the MDF. This type of hardware is usually found to hold drawer fronts or tabletops on, and the treads of these bolts is a very common failure point.
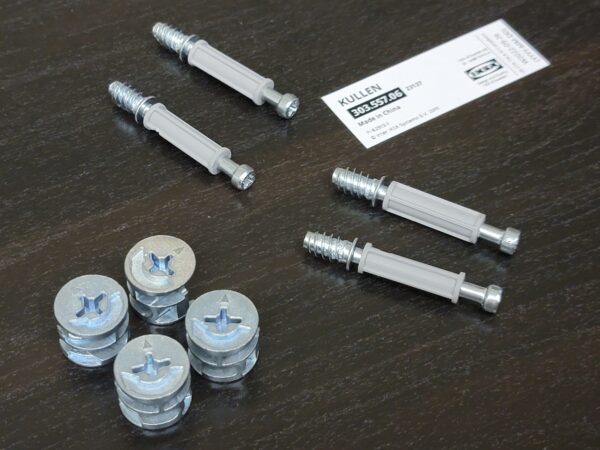
Basically, anywhere there’s screw threads or metal that is coming in contact with the MDF “grain,” you’ll want to wick in a generous portion of thin CA glue and let it harden up the fibers.
Use wood glue to permanently attach dowel pins
Technically just about everything in Ikea’s furniture is reversible, and people may have some idea that someday they could dissemble the furniture. Why? No one does that. Unless there is a very compelling reason for you to do otherwise, I’d like for you to think of “assembling” this furniture as a one-way process. It is going to become a piece of furniture, and to do that well, necessitates that it is irreversible. (One exception I have is my motorized sit-stand desk. The base is very large and heavy, and with the top attached, it can longer fit through any door frames, so I made the top detachable.)
With the idea of permanence in mind, use some wood glue (even white elmer’s glue can be used as a substitute) to permanently join and mate the pieces together. Just be sure that you fully seat each of the dowels into the holes so that they’re not sticking out too far, which would not allow the pieces to fit together flush.
Remember, permanence = strength.
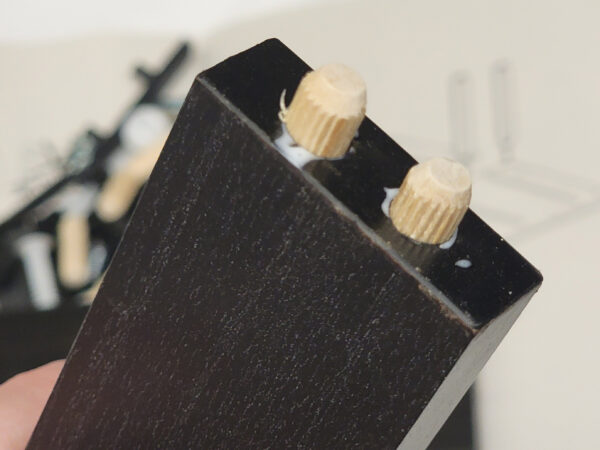
Even though the pieces feel pretty tight without glue, they’re not glued, and so they are capable of moving. Let’s say you lean up against a desk or table, putting sideways pressure on the unit. Yes, the unglued dowels may still hold, but they may move ever so slightly by a fraction of an inch as you put stress on the piece. Then when you repeated lean or rest on the piece, over the course of time, the holes can start to enlarge, the dowel pins become loose, and before you know it, you’ve got yourself a rickety, wobbly piece of furniture that’s the calling card of MDF mediocrity.
Use angle brackets where appropriate
Sometimes, even with all the precautions above, there’s just a feeling that it won’t hold up. The best example of this would be the top of a night stand or table top. Let’s say you have to move it, where would you instinctively grab it? By the top, of course. So now, the entire weight of the piece of furniture is being held up and strained by, probably at most, four knock-down hardware bolts. Sure, the bolts were strong enough to hold the top down to the rest of the frame, but can it do the reverse? Can it hold up the entire piece by these same bolts? I don’t think most pieces were designed for this.
This is where reinforcement comes into play. You may know how to gingerly handle your MDF furniture, but what about the rest of your family? What about the volunteer movers? Instead of wishful thinking, it’s probably best to shore up any weak spots now before someone ends up (gasp!) handling your furniture like a normal human being.
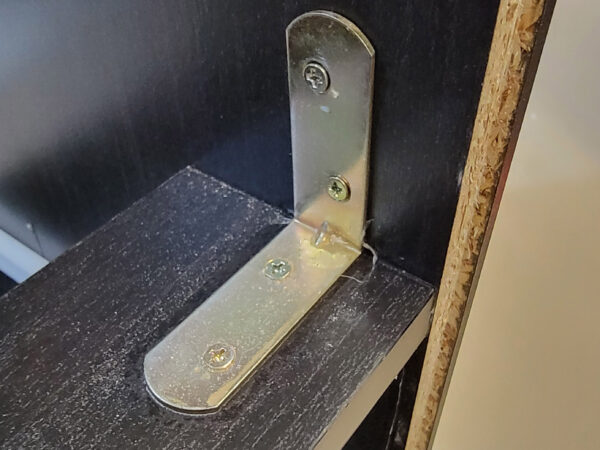
When adding angle brackets, because you are using screws, you again need to take extra precautions. Drill pilot holes for the screws, and make sure that the screws both (a) go deep enough into the panel to have a strong grip, but also (b) aren’t too long that they poke through the other side. This can be a very delicate balance. In standard 1/2″ or 3/4″ thick MDF, I’d aim for screws to go in maybe 1/8″ shy of piercing through to the other side, including the thickness of the bracket itself.
Pro tip: On damaged or stripped screw holes, you can reinforce the MDF and possibly get new life out of a piece by (1) backing out the screw, (2) inserting and breaking off toothpick(s) into the stripped hole, and (3) reinforcing the new wood with either thin CA if gravity will work in your favor, or wood glue in harder to reach locations. (4) Lastly, once the glue has started to set up, drive the screw back into the toothpick/glue filled hole.
Waterproof exposed surfaces
You may have noticed that MDF soaked up CA glue very readily. The same is true for moisture and water. And unfortunately, it has the opposite effect as the glue. Water can get into the fibers and cause them to expand, greatly weakening the material (not to mention making it an eyesore).
If there is exposed MDF anywhere on the furniture piece (especially the bottom legs/base), make every effort to seal it up from casual spills or other moisture and humidity. This can be accomplished through paint, wood finish, or even slathering a generous amount of yellow or white glue on/into the surface. The glue won’t look very pretty, but it does a good job of sealing the fibers, especially in areas that may not be visible, such as the undersides of legs where spills may occur.
Accept that very large pieces are (practically) hopeless
With all the tips above, it should be noted that one of the biggest problems with MDF is the weight in combination with the relative weakness of the fibers. So things like entertainment stands, beds, and large dressers are all very prone to toilet-paper-like self-destruction. The very act of simply tipping one of these pieces onto its side in preparation for grabbing it to be moved is enough to put extreme stress on the knockdown hardware bolts and other joints. Instead of the MDF mostly supporting its own weight, all the heft is transferred and concentrated to a few corners, if even for a few seconds. Every time this happens, the screw threads start to get a little looser, and things start to get sloppy.
Contrast this with solid wood, where the strength of the glue joint has been demonstrated, in most instances when done properly, to exceed even the strength of the wood itself. That’s because the glue has a chance to soak into the wood fibers, locally reinforcing them beyond their natural strength. Assuming the furniture is well made with good joinery, the piece would sooner break apart anywhere along the wood grain before breaking at the joints.
[dovetail joint]



I’ve assembled two large IKEA work tables and cabinets using this technique and they have survived for over a decade as well as several moves with no damage!
Thanks for the article, Eric. I understand this is not ideal, but do you think there’s any way I could reinforce an Ikea extendable desk? It’s already assembled and I have it for years. I’d like to repurpose it to hold an aquarium just so I wouldn’t get rid of it, but is this really possible/worth it?
Personally, I wouldn’t try it, but it’s hard to say for sure without know the speicifcs of the desk, and the size of the aqurium, and the amount of moidifications you’d be willing to make. Also, often water can seep into the joints of laminated MDF or particleboard and end up causing damage.
Great article. One thing, though: the pictures all show particle board, not MDF – which is actually not that widely used at IKEA (see https://www.ikea.com/global/en/our-business/people-planet/wood-design-and-innovation/).
This was a helpful, straightforward article that helped me accept the limitations of MDF furniture. With that said, I still need to go that route, so I’d like to take the steps you’ve outlined to strengthen it as best I can. Regarding the CA glue: do I need to let it dry in the screw holes before screwing on knockdown hardware, or do I screw in the hardware while the glue is still wet?
You can do it while the glue is still wet if you’d like, just keep in mind there’s a slight chance that if you stop midway through screwing it in, you may permanently glue the screw in position only partially inserted.
Do you have any suggestions for a support bar or device to strengthen a bed rail made of MDF? it has a wood bar at the bottom.
Thank you for this article! These are great tips. Even the “highest end” IKEA furniture is weakened by the use of MDF. I have a question that I hope you could weigh in on. We bought 2 HEMNES IKEA dressers ($270.00 each) that use those very short, flathead/ flat tip screws to hold the metal sliders onto the sides of the drawers. The screws will not stay in, the drawers fall, and over time, the screw holes expand from all the re-screwing. I followed someone’s tip to fill the holes with a combination of wood glue and small dowels and… Read more »
Do you have any pictures of the problem area? Have you tried drilling a small pilot hole first?
Attached are some photos (I can’t tell if they’re in the correct order). You can see how the sliders are supposed to attach with screws. I have filled in the screw holes. The tiny flat-ended screw is the one provided by IKEA. Should I fully drill in a pointed screw first? I did make a small shallow hole, but the flat tip screw won’t take hold.
Looks like the screw you’re using are not meant for solid wood. The shaft diameter should be much narrower. I’d go to a local hardware store and look for some short sheet metal screws that are approximately the same length. I’d guess maybe a #8 x 1/2″ would work. Also you should get pan head screws instead of flat head.
Thank you for the tips! For $4.00, a pack of different screws is worth a try!
Fingers crossed.
Have a great day!